
An hour after celebrating a successful validation in the VCF 9.0 installer and getting ready for real deployment testing (which I made a short LinkedIn post about yesterday), things went sideways. My first deployment attempt of the management domain with just vCenter, SDDC Manager, and NSX, failed when it reached the NSX step, with an error:
NSX install image validation failed for NSX Version – 9.0.1.0.24952111 Remediation: Please download NSX install image with Version – 9.0.1.0.24952111 Reference Token: XXXXXX
⏩TL;DR;
The workaround further down makes it possible to deploy a VCF 9.0.0.0 management domain after VCF 9.0.1.0 was released. This works around the NSX error you see above. Skip down to the workaround here.
👨🏻💻The Setup
- This was a greenfield test environment running on four Dell PowerEdge R740xd hosts (1×6248R, 768 GB RAM, vSAN OSA). All hosts had ESXi 9.0.0.0 installed (clean).
- I completed the VCF Planning and Preparation Workbook (v1.9.0.005) and generated a JSON spec using the VCF.JSONGenerator PowerShell module.
- The VCF Installer 9.0.0.0 appliance was deployed outside the intended management domain, with online depot access token configured.
Even though VCF 9.0.1.0 was released recently, I deliberately chose to start at 9.0.0.0, so I could test and document the upgrade to 9.0.1.0 later. Learning by doing.
🤞First Attempt
Inside the VCF Installer, I noticed the latest VCF 9.0.1.0 metadata had already been pulled from the depot (release notes). I specifically selected 9.0.0 in the dropdown and chose to only download the SDDC Manager, vCenter, and NSX bundles for that version (9.0.0.0).
I uploaded my JSON spec to the VCF Installer, ran validation, and got the all-green successful validation checkmarks screen I shared on LinkedIn yesterday.

So it was time to hit deploy, and watch it go about deploying my management domain.
- vCenter ✅
- SDDC Manager ✅
- vSphere Cluster Config ✅
- NSX ❌
The NSX deployment failed with this message:
NSX install image validation failed for NSX Version – 9.0.1.0.24952111 Remediation: Please download NSX install image with Version – 9.0.1.0.24952111
But I didn’t ask for NSX 9.0.1.0 earlier. I’d only selected and downloaded the 9.0.0.0 bundles.
🪲Bug Confirmed
While waiting for reply back from one of my Broadcom/VMware contacts, I downloaded the 9.0.1.0 NSX bundle anyway and tried a redeploy. Same result. Still failed.
I got confirmation earlier today from my VMware contact, this was a bug (bug 3590350 aparantly), and a workaround is to be published in a KB article in a few day.
He did share the workaround early with me and gave me the green light to ✍🏻 blog about it.
🛠️The workaround (with an extra step/update from myself)
The root of the issue seems to be that the 9.0.1.0 manifest with NSX specifically, is referenced during the deployment, even when 9.0.0.0 is selected. The workaround involves removing 9.0.1.0 from the manifest, disconnecting the online depot to stop it from coming back and uploading a clean manifest with only 9.0.0.0 release.
Step-by-Step Workaround
- SSH into the VCF Installer appliance as ‘
vcf‘ user. - Copy the manifest file twice (I keep an extra copy of the original):
cp /nfs/vmware/vcf/nfs-mount/metadata/vcfManifest.json vcfManifestWithout901.json
cp /nfs/vmware/vcf/nfs-mount/metadata/vcfManifest.json vcfManifestWith901.json - We need to remove the element describing the 9.0.1 release (lines 1707-2191). Be careful to not break the syntax of the json file if you are deleting manually. I’ve made a one-liner so you don’t have to do that manually, and also thrown in a quick and dirty validation of the new json file:
- Remove the 9.0.1.0 block from the manifest (explaination below):
sed -i -e '1707,2191d' -e '1706s/,$//' vcfManifestWithout901.json
This deletes the 9.0.1.0 release section and fixes the trailing comma to maintain valid JSON. - Verify the JSON syntax:
jq . vcfManifestWithout901.json | head -n 3
- Remove the 9.0.1.0 block from the manifest (explaination below):
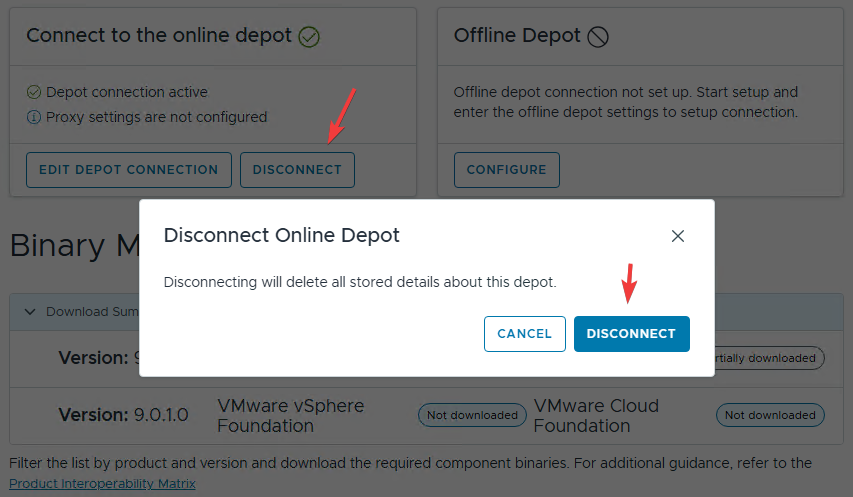
- Disconnect the online depot (this step is added by me, it was not mentioned by Broadcom). If you skip this, 9.0.1.0 metadata will come back within minutes.
- Switch to
rootuser:su - - Clear the manifest from the local database:
psql -h localhost -U postgres lcm -c "DELETE FROM manifest;" - Get a token to authenticate with the API – replace the “
VMware1!VMware1!” password with your own for ‘admin@local‘ (one line):TOKEN=$(curl -H 'Content-Type:application/json' https://localhost/v1/tokens -d '{"username":"admin@local","password":"VMware1!VMware1!"}' -k | jq -r '.accessToken') - Upload the modified manifest (one line)
curl -k -H 'Content-Type: application/json' -H "Authorization: Bearer $TOKEN" -X POST https://localhost/v1/manifests -d "@/home/vcf/vcfManifestWithout901.json"
‘sed’ command explanation
-i→ changes file (“in-place”)-e→ combine more commands1707,2191d→ delete lines 1707-21911706s/,$//→ on line 1706 (1706s/…/…/), search for comma (,) at the end of the line ($) and remove it
‘jq’ command explaination
‘jq’ will try to parse the changed file, and if the syntax is OK, you should see the first 3 lines of the file. If the syntax isn’t correct it will show: Failed: parse error: Expected separator between values at line XXXX, column YY
👍Workaround done!
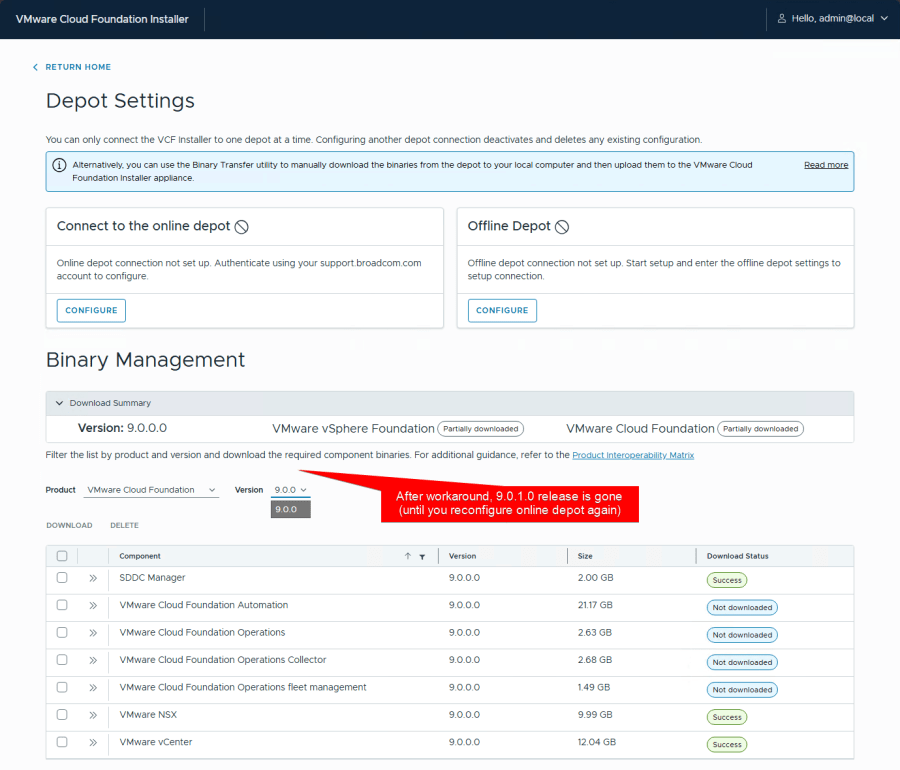
Go back to the Installer UI, refresh the Binary Management page. You should only see VCF 9.0.0.0 and its bundles in the list.
Now you can go back, upload your JSON spec file, validate, and deploy.
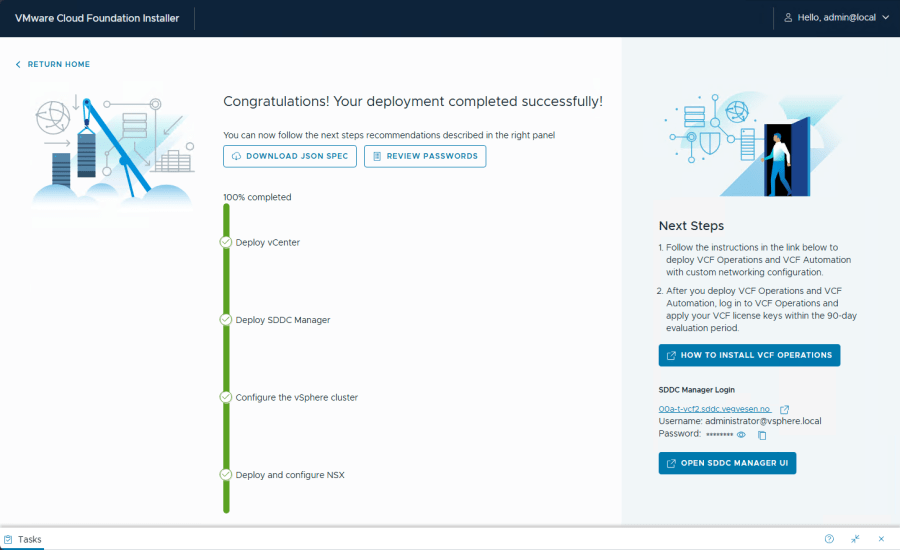
With the workaround in place, the deployment completed without issues, including NSX 9.0.0.0. From start to finish, it took just over 2 hours.
ᝰ.ᐟFinal Notes
I ended up redeploying the installer from scratch before applying this workaround.
If you’ve already started a deployment and hit this bug, you might still be able to recover using the workaround, but I haven’t tested that. Let me know in the comments if it works for you.
If you haven’t started yet, and don’t care about upgrading 9.0.0.0 to 9.0.1.0, you may want to just start with 9.0.1.0 directly.

Hi Thank you for your efforts.
Is it OK to have this message on last step?
root@vcfinstaller-a [ ~ ]# curl -k -H ‘Content-Type: application/json’ -H “Authorization: Bearer $TOKEN” -X POST https://localhost/v1/manifests -d “@/home/vcf/vcfManifestWithout901.json”
{“errorCode”:”Unauthorized”,”message”:”JWT strings must contain exactly 2 period characters. Found: 0″}
LikeLike
Hi MarN,
Did you by any chance write the wrong password when getting the TOKEN? Does the $TOKEN contain a bearer token?
LikeLike
Works fine. Used wrong password 🙂
LikeLike
Worked like a champ. Thanks for sharing. I’m on the broadcom forum thread where this site is mentioned. In the thread the broadcom employee mentioned using installer 901 for the 900 vcf install. I did, thinking maybe 901 installer would install either product line 900 or 901. It failed with the same nsx error. So I started over and used 900 installer following your guide above. Works perfect. The goal is to start with 900 and learn how to upgrade to 901.
LikeLike
That’s great to hear Tom. Happy to help.
This is the same reason I’m starting with 9000. Get some experience with the upgrade tasks early on.
LikeLike
hi chris, awesome setup and lab! may i ask if i could build a 3-node vcf in my 144gb ram hpe dl380 gen9 server? thanks.
LikeLike
nested 3 node on one hpe gen 9 server? Or 3 hpe servers? I think you should check out WilliamLam.com’s extensive posts about VCF labs: https://williamlam.com/vmware-cloud-foundation-9
LikeLike