
Intro
The QNAP TS-469 Pro is a 4-bay NAS released around 2012, powered by an Intel Atom D2701 dual-core 2.13 GHz CPU with hyper-threading. It originally shipped with 1 GB of RAM and QNAP’s proprietary Linux-based OS. While no longer officially supported, the hardware is still perfectly usable for light storage tasks.
By upgrading the memory to 4 GB (2×2 GB DDR3 SODIMMs) and installing a lightweight, modern NAS OS like OpenMediaVault 7.4 (“OMV”), I’ve repurposed the device into a flexible home lab storage server. OMV is well-suited for older systems thanks to its modest resource requirements, while still offering current filesystems, plugin support, and a clean web-based interface—bringing new life to aging gear.
Here’s how to install OMV on the old QNAP TS-469 Pro.
Preparation
- Recommend buying a couple of identical 2GB DDR 1333MHz SO-DIMMs to have 4GB RAM for OMV. Yes, it works, even if QNAP says 3GB is max. Installing OMV7 x64 makes use of 4GB just fine.
- Get a decent USB 3 USB drive for installing and running the OMV from, preferably 16-32GB of size. I’m using a SanDisk Ultra Fit 32GB. Using a USB drive for the OS has several benefits:
- Operating system on a separate drive.
- Do not occupy a SATA bay for this purpose.
- Ease of creating a backup of the operating system. Just insert the USB drive into another PC and create an image.
- Get another temporary USB drive, 2 GB should be fine. Even USB 2.0 will be OK. We will use this as the installation media. You will most likely install OMV a bit faster with USB 3 drive (connected to the blue port at the back) but it’s fine with USB 2.0; which I used myself. Installation took less than 30 minutes.
- Connect a monitor and keyboard to the QNAP, and restart the NAS box. Keep pressing F2 to enter the BIOS. In BIOS, disable UEFI, disable high quality graphics. Save and turn off the NAS.
- OpenMediaVailt Installation Media
- Download the latest OMV ISO from https://www.openmediavault.org/download.html As of September 9th 2025, it was v7.4.17, which is based on Debian 12 (Bookworm). We can expect OMV v8 later, based on Debian 13 (Trixie) which was just released.
- Use Rufus (windows) or dd (linux) to create an bootable USB drive.
- For Rufus, I used ‘dd’ mode instead of ISO.
- For Linux (Mac too?) you can run this command:
sudo dd if=xxx.iso of=/dev/sdX bs=4096
- Connect the NAS box to your switch or router for internet access. The bottom network port is the “first” port, named “enp4s0”. Second (top port) is “enp5s0”.
- Recommended to remove any HDD drives in the NAS device before you install. You might even remove the USB DOM (onboard 512MB storage with QTS 4.3.4 OS), and only have the USB 3 drive that you will run OMV from installed.
Installation
- Insert the installation media USB in the USB3 slot furthest from the edge and the USB3 drive where we will install OMV in the USB3 slot closest to the edge (USB3 are blue inside).
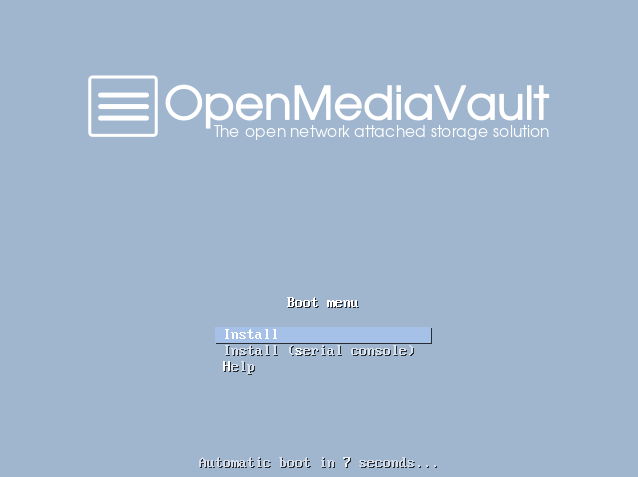
- PowerOn the NAS and if everything went fine, you should see the installer boot menu screen below. If you see something else, you have probably forgotten to disable UEFI.
- Go through the installer step by step. If the installer detects multiple drives, it will ask you for which to install on. But the best option is to not have any HDD drives in the NAS device when you install. You might even remove the USB DOM (onboard 512MB storage with QTS 4.3.4 OS). For more screenshots from the installation, check the OMV documentation here: https://docs.openmediavault.org/en/latest/installation/via_iso.html
- When OMV is installed and the system reboots, remove the installation media.
- OMV should now boot and after a minute or two, you should see the login prompt on your monitor. This should show you which IP you can reach OMV on in your browser, like this:
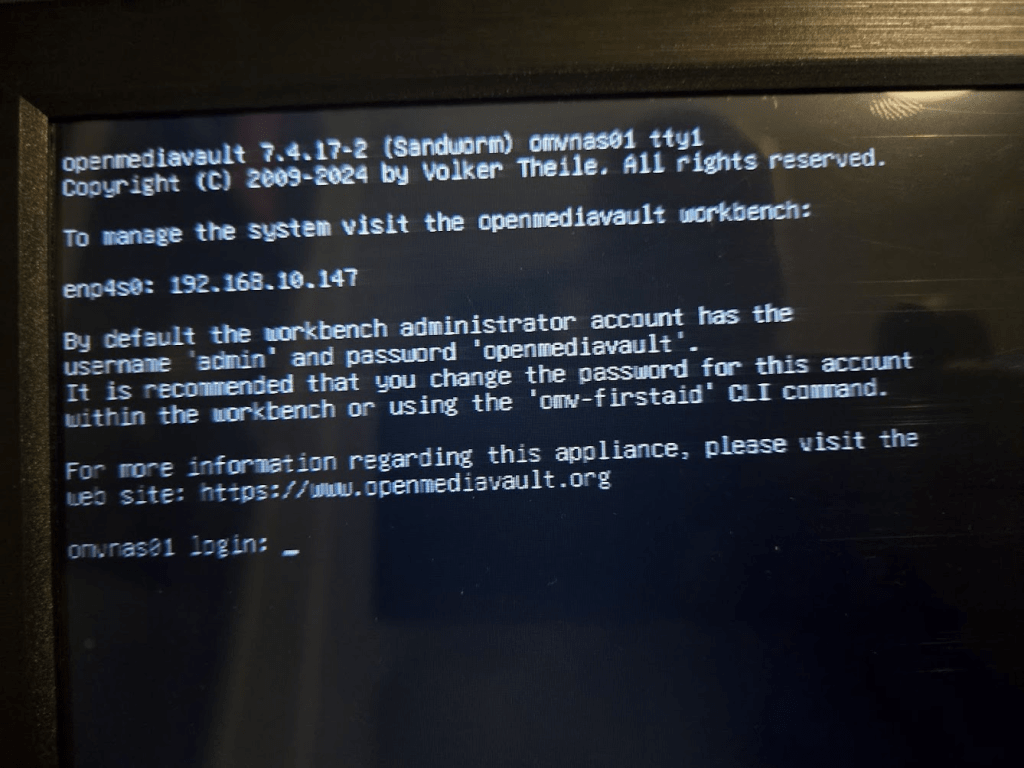
Browse to the OMV WebUI by typing http://IP-address (not https). Log in with ‘admin’ and ‘openmediavault’ and you should see the (empty) dashboard:
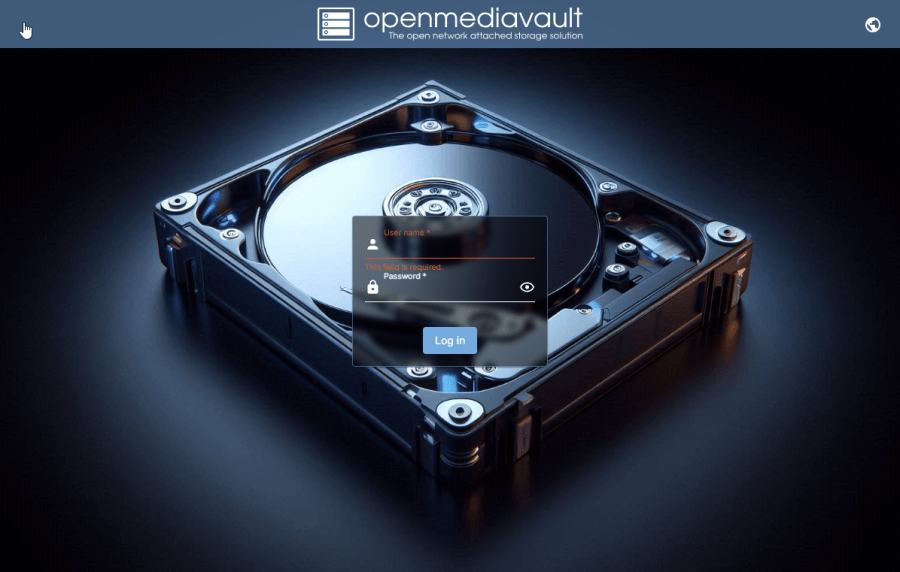

OMV WebUI Dashboard
Important first configurations
I would say the three most important things to configure/do first is secure the system. This means:
- Change ‘admin’ password
Click on profile icon (person) in the upper right corner > Click Change Password - Install all available updates
Click the alert icon (bell) in the upper right corner > Click on Updates available > Click on the “down arrow with a number on top” > Check to Confirm you want to upgrade all packages > Click Yes.
OMV will upgrade the system to the latest version. This will probably take 10-15 minutes, but you will see the progress in the WebUI.- During my my first upgrade, after the certificates package was updated, I got a ** Connection Lost ** message in the upgrade progress window in the WebUI. I clicked “Close”, and then I was presented with a ‘Pending configuration changes’ banner, which I accepted by clicking on the check mark ✔ and accepted/confirmed the changes.
- If you refresh the WebUI after the configuration changes have been applied, you will see all update packages are gone.
- Click on the alert icon again, and you will most likely see you should reboot the system to apply all changes. This is done by clicking the power icon, also in the top right corner. Reboot the system. Then go ahead with #3 – enabling flashmemory plugin.
- Enable
openmediavault-flashmemoryplugin. This lowers the amount of writes to the USB flash drive, making sure you can enjoy it for a long time. To do this we need to install the OMV-Extras package. You can read all about here: https://wiki.omv-extras.org/- Enable OMV-Extras
- From console of via ssh, run the following command (one line):
wget -O - https://github.com/OpenMediaVault-Plugin-Developers/packages/raw/master/install | bash - Hard reload the browser by pressing ctrl-shift-R
- From console of via ssh, run the following command (one line):
- Install “
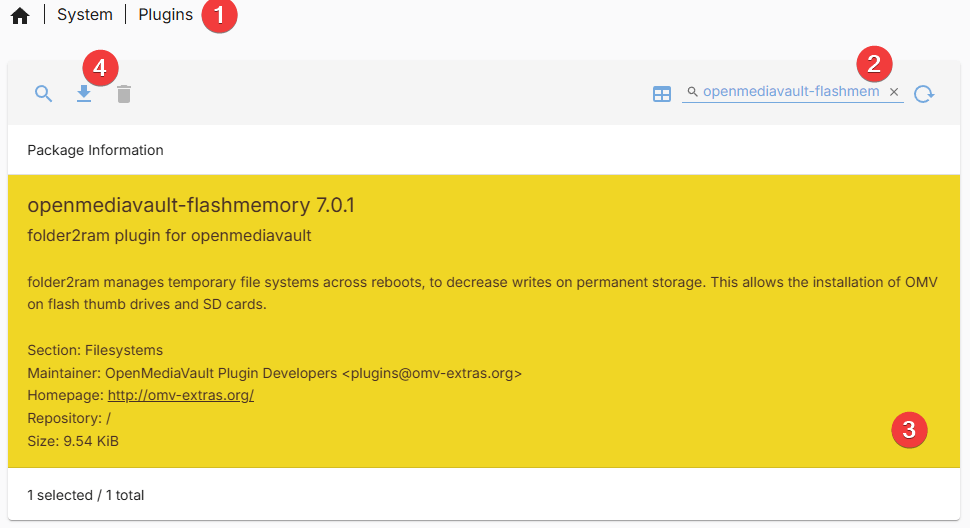
openmediavault-flashmemory“- Navigate to Plugins: OMV > System > Plugins (1)
- Search for “openmediavault-flashmemory” (2)
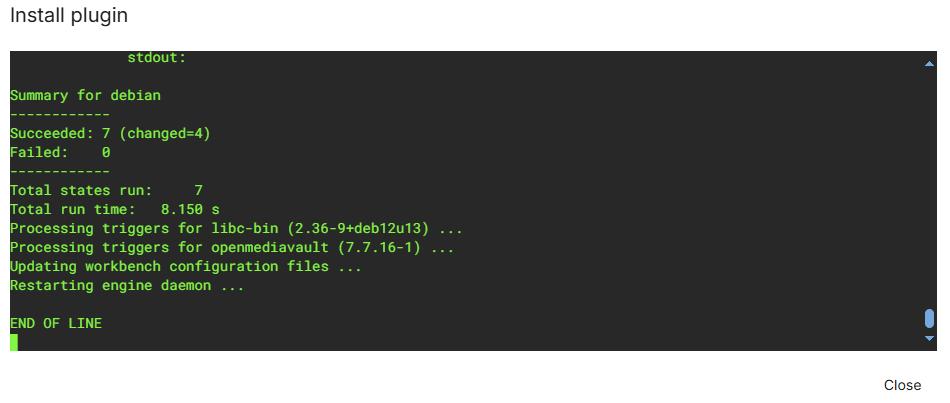
- Click on the plugin (3) and click on the “down arrow” icon (4) to install it. Hopefully there are 0 (zero) failed settings in the installation output.
- Restart the server the first time after the plugin installation.
- Enable OMV-Extras
If (when) you have configured your dashboard with one of the Services widget, you should now see a line/grid in Services indicating that the add-in (“FlashMemory”) is installed and working.
After the reboot, there might be more updates available. It was for me. Install them as well and reboot if required. After this second round of updates, my OMV installation was now running OMV v7.7.16-1 using Kernel 6.12.38. Installatino started with OMV v7.4.17 on kernel 6.1. And the entire running system is only using 495MB of RAM at this point.
What’s next?
I will follow up with another post on configuring my HDDs and other settings and plugins I find important for this ancient revived NAS device. I don’t want to overload it with unnecessary extra services. I have a Synology with Xeon CPU and 48GB RAM for that 😎.
At the moment I have 2 x 4TB WD Black SATA drives in the device for some basic testing. My goal is to put 4 x Seagate Exos X10 (10TB) I have lying around into the box, in a RAID-10 array. I probably won’t do RAID-5, even for archive purposes. Here is a decent read about why it is not the best solution to go with RAID-5 on such large drives: https://www.zdnet.com/article/why-raid-5-stops-working-in-2009/ 😬.
I mostly run RAID-6 on my other HDD NAS box(es), but this ancient thing only have 4 slots. So RAID-6 would give me same available disk space (~20TB) as RAID-10, with less performance. Maybe I want the extra redundancy compared to speed? I will do some benchmarking and see how fast/slow this box will be with RAID-6.
